Backs and Binding
 |
| binding pressed, wound, and ready to use January 2016 |
The burgundy flower fabric produced enough binding for two quilts, the light brown swirls on the top is adequate for two quilts, the burgundy in the center is for one quilt, and the dark brown on the right will bind one quilt. The dark brown swirl fabric at the bottom of the photo is one of four backs that I prepared from some wide-back yardage (108" wide)
Whenever I prepare binding, I thank Lori for telling me about a wonderful tool that makes pressing the binding quick and painless.
 |
| Press the seams of the binding strips open |
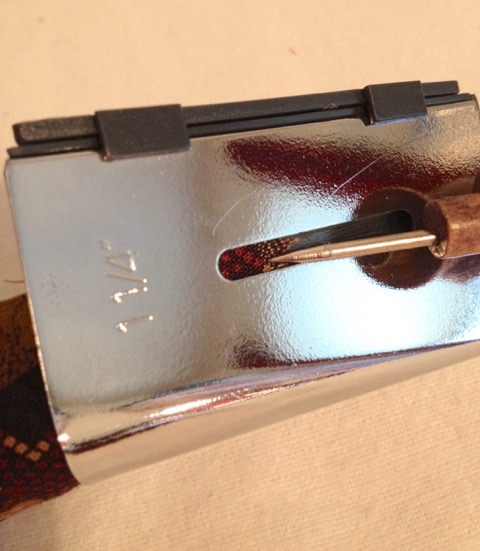
 |
| 1.25 inch binding tip |
 |
| insert the fabric in the curved slit on the back |
Gently push the fabric through the slit until it is visible at the opening on the flat side of the tip. At this point, I use my stiletto to work the fabric down to the end of the tip.
 |
| Straighten the fabric so it is folded perfectly |
Once the fabric is through the tip, gently straighten it until the two layers are folded perfectly in half.
 |
| Press the end of the fabric and gently draw the tip to the left. |
Now, you are ready to press and prepare the binding. Press the fabric as you gently draw the tip to the left. The shiny flat edge of the tip should be against the ironing board, and it will glide smoothly. When you reach the end of the ironing surface, move the pressed binding off of the board, so you can continue pressing the strips.
 |
| At the seams, place your hand before the tip and gently tug the tip over the seam. Continue pressing. |
I usually prepare 7 - 8 strips of 2.5 inch fabric for the Quilt of Valor binding, so there are several seams. The seams may be tight in the binding tip, so you will need to place your right hand on the pressed fabric, and then gently tug the tip over the seam.

Continue pressing until you reach the end of the fabric strips.
 |
| completed binding |
When the full length of the binding has been pressed, I wind it on a piece of cardboard and secure with a pin until it is needed.
I no longer dread making binding thanks to Lori and this simple tool.
Note: the tip can be found online, in larger quilt shops or even in hobby stores that sell fabric. Amazon gives you the specific details and an idea of price - as I illustrated in this post, you do NOT need to purchase the Bias Tape Maker machine to use this tip to prepare quilt binding.

Even with that handy tool, it must have taken a good amount of time to make all that binding. You're two quilts ahead by my count. Nice work!
ReplyDeleteYou are a wonder lady... or wonder woman!
ReplyDeleteThat truly is a waste not, want not mentality! I love that you use up EVERY bit.
ReplyDeleteWhat a great little tool! Good to know some tricks of the trade...and save yourself some hot fingers and more tedious folding.
ReplyDeletePeople invent the cleverest tools and this is such a simple idea.
ReplyDeleteThis is so cool. I sent my mom the link to see if she has one or if she'd like me to get her one. However now I know why I'm not a quilter ... I'm allergic to the iron!
ReplyDeleteFunny, I don't mind making the binding -- I don't like sewing it down by hand. I have now pretty much started sewing both sides of binding by machine. Maybe small ones I'll sew by hand...
ReplyDelete