Posts

Showing posts with the label rug

Cramped Quarters

Image
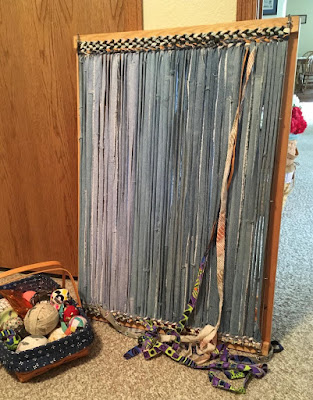
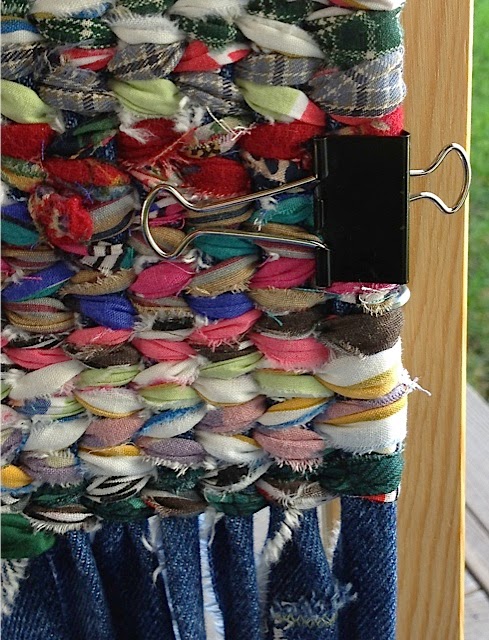
May 2020 ~ September 2021 It took nearly over two hours to twine the last two inches of the rug because of the cramped quarters. (Normally, I can twine four/five inches in a hour) As the working space got smaller and smaller progress slowed to a crawl. I work until I can’t get my fingers around the warp fabric and then I use two Aunt Philly’s needles - one for each weft fabric. I work until the warp is covered and then I add one more row for good measure.  The rug is finished and off of the frame - 16 months after it was started . 

Patio Crafting

Image
twining on the patio July 2020 I haven't done a lot of twining lately, so last week I tried to work at least two afternoons on the patio. One of the days, I called a friend to come over and visit while I worked. We chatted (social distanced) for a couple of hours, and I made progress on the rug.  seven inches to twine July 2020 Saturday, the temperatures were in the mid-70s, and it was very pleasant to sit on the patio and work on the rug for an hour or two. I now have only seven inches remaining to twine before the rug can come off of the frame. 

Making Progress

Image
close-up of twining May 2020 Last week, I had some quality time with the twining frame and surprised myself with how much I got accomplished. twining on the patio Since twining is messy (strings and lint), I set up camp on the patio. A couple of neighbors dropped by to check out the process and to chat a bit. eight inches completed at the top and at the bottom of the rug frame May 2020 By Saturday afternoon, I had nearly half of the rug completed. I work from both ends for several reasons: it helps control the tension, it is motivating, it is easier to finish the rug away from the end of the frame. I do not attempt to match the top and the bottom. When I start twining, I pull colors and separate the strips into two grocery bags (one for the top and one for the bottom). The bags contain the same colors and quantity of strips per color; however, when I'm twining, I pull the strips out randomly.

Ready to Work

Image
starting a large twined rug May 2020 I worked on the twined rug a bit last week and have enough rows at both the top and bottom to hold the warp on the frame.  Hopefully, the weather will cooperate enough this week so I can work on this project on the patio. Twining is messy because of all the strings and lint that comes off of the fabric. It't just easier to do it outside. Over the years, I've taught several community classes on twining and have made over 30 rugs. Mom, who made rugs for the farm house, taught me how to twine when I was in 4-H. The photo below was used in an earlier post that can be found here . Mom working on a twined rug possible late 50s or early 60s

Unearthing a UFO

Image
small rug frame with UFO rug May 2020 Friday I worked in the garage labeling the plastic totes on the shelves. I've been meaning to do it for over a year but kept procrastinating. I discovered the small rug frame in one of the bins, and decided to finish the long neglected UFO. finished placemat and/or rug May 2020 Finishing the mat did not take very long - probably two or three hours. It's the perfect size for leaving my shoes when I come in from outside. I rarely wear shoes in the house. The larger rug frame was also unearthed in the garage. I grabbed a ball of prepared denim and loaded the warp on the frame. I haven't twined for nearly five years and look forward to sitting outside on the patio to twine. Previous twining posts can be found here .

County Fair Success

Image
all the items entered in the 2016 Fremont County Fair The County Fair was held last week, and the items I entered showed well. I was pleased to bring home 9 blue ribbons, 2 red ribbons, 1 reserve champion rosette, 2 champion rosettes. Noro Baby Surprise Jacket Judge's comments on the back of the Noro BSJ entry tag: Wonderful little garment - very nice color work appropriate for garment and age of user. Noro Hitchhiker  Judge's comments: lovely color work - fine knitting, too - even points and stitches. Nice, nice! Encore Baby Surprise Jacket Judge's comments: Wonderful sweater! Love the colors - stitches are beautiful. Items entered and ribbon received:     •   Faroese shawl - blue     •   Nymphliadia shawl  - red     •   Twined runner - blue     •   Lacy Hitchhiker - blue     •   Desk chair socks - blue     •   Infinity scarf - blue     • ...

Twining Class Wrap-up

Image
twined runner December 2015 Mid-December was the last session for the Rug Twining class at Fort Washakie. Only one of my students finished a rug, but the others have the technique mastered and should finish their rugs in short order. During the class and subsequent work sessions, I finished a rug and the runner, shown in the photo above. The fabric strips from the last row on the runner still need to be woven into the rug before I can call it finished. Ingrid's finished rug December 2015 I want to commend Ingrid on her finished rug. For the record, it is exceedingly difficult for a beginner to twine with the two strips the same color, and Ingrid did it beautifully on her entire rug. Well done, Ingrid! An earlier post on the rug class can be seen here .

Twining Class

Image
Twined rugs on display Fremont County Fiber Arts Exhibit Fort Washakie, WY June - July 2015 The rug and frame (shown above) at the Fiber Guild exhibit in June drew some interest from those eager to learn the process. Dates and times were determined, and the first session was on September 12, 2015 in Fort Washakie for three students. Another lady joined us at a work night held two weeks later, and others may join at the next scheduled class meeting in October. Ingrid T. tightens the eyebolts on her rug frame  Students assembled their frames: nails were pounded, corners squared, and eyebolts affixed.  Lorre H. loads the warp on her frame.  After the frames were built, denim was stripped and sewn into strips so the frames could be loaded. The process of twining was demonstrated and then practiced by the students. Before leaving for the day, they had at least two - three rows started at the top and bottom of their frames. The class would have a "work nig...

Motivational Marker

Image
Twining September 2014 I use a simple Bulldog clip to help me see my progress when twining. I move the clip to the bottom of the last row and twine from that point. The photo shows that I've added about an inch since I last moved the clip. An inch may not seem like a lot, but it sometimes can take 30 minutes or more to twine an inch. When knitting, I often attach a removable stitch marker so I can see my progress. These clips and markers keep me motivated on seemingly endless projects. What tricks do you use on projects for motivation?

Autumn Afternoons

Image
Twining on the deck September 2014 Temperatures have been in a state of flux the last few weeks as Autumn creeps down the mountainside. It can be 80 F one day and 50 F the next. I usually start the day with the house closed and fling open the windows and doors by mid-day. I added a down comforter to my bed about a month ago, and in another month, I'll probably start using the flannel sheets. Recently, I've been trying to twine outside as much as I can. The lint and strings can be easily swept off the deck, and I can enjoy the gentle breezes. All too soon, it will be too chilly to twine or to knit outside. How do you like to spend Autumn afternoons?

Measured progress

Image
Twined rugs are worked from each end to an area near the middle of the frame. This rug has progressed fairly quickly and, in this photo, is nearing completion. As the open area gets smaller, it takes longer and longer to maneuver the fabric strips through the warp strips.

Twisting and Turning

Image
It has been a long time since I've done any twining. However, since I'm going to demonstrate the technique at the Fiber Guild Fiber Fest in October, I thought it might be wise to make a couple of rugs to refresh my skills. My fingers and hands fell into the rhythm with little difficulty. Normally, I sew the strips together as I twine, but a sewing machine might not be too handy to use during the demonstration; thus, I'm making this rug by connecting the strips with the slit and loop method. This method speeds up the process but also creates more bumps and knots in the rug. Older posts on twining and the rugs I've made can be found here .

Twining Again

Image
Last week I finished a rug which had been on the frame for over a month. This rug, the twenty-fourth that I've twined, will be in the Fremont County Fiber Guild show at the Lander Art Center . Some of the Guild members' items will be offered for sale. The His and Her Aran Christmas stockings , two rugs, and two quilts ( Duluth Stars and Down the Garden Path ) are my contributions to this year's show. While I love twining the rugs, I detest the mess that they create. Literally every surface in my house was covered with a layer of lint which the fabric strips slough off during the twining process, and all I seemed to do when I attempted to clean was move it around to another spot. Friday and Saturday I battled the elusive lint, and now the house is nearly lint free.

Winter Crafts

Image
On winter evenings, my mother twined rugs to use in the porch and in the house. I remember that she frequently wore dresses and aprons until my father died in 1965. During his battle with cancer, Mom began wearing shirts and pants because she took over his farming and milking chores. I don't remember her working on rugs after he died. The cat was probably entertained by the fluttering fabric strips. Mom loved cats and always had several in and near the milking barn. The cats loved to clean the buckets after the calves were fed. Everywhere mom went on the farm, she was escorted by cats. Oddly, I only remember having two house cats. I think this photo was taken in the early 1960s because the floor tiles are not in the kitchen (shown at left), and I remember when the flooring was installed.

Prep Work

Image
Last summer, I spent two afternoons striping piles of blue jeans (about 20 - 25 pair) for the rugs that I make. I do the striping outside because it is so messy with lint and strings going everywhere. Very little of the jeans go to waste. The denim strips are ripped about 1 - 1 1/2 inches wide from the cuff to the pockets. All of the loose strings are removed from the strips. Yesterday, I found the bag of strips in the garage and began the process of sewing them together. The bag was stuffed with the strips. The strips were chain-stitched and placed in a crate. As the pile of strips in the crate grew, I could not see the bottom of the bag. Was I making any progress? Then, the end was in sight. The crate was filled, and the bag was empty. The crate filled with strips turned into this. . . Four balls of denim strips (enough to make four rugs) ready for the rug frame. I fold the strips in half as I roll the ball, and by the time they are needed, the strips lay flat. On the frame, the ...