Posts

Showing posts from August, 2019

Gill Street Mural - part II

Image
large fish on the southern most end of Gill Street mural Laramie, WY August 2019  As I mentioned last week, the Gill Street mural is huge. This week, the photos depict the fish on the southern end. This image gives you some idea of the size of the mural.   More fish photos next week from the northern and eastern ends of the mural. 

Chain Sewing

Image
chain-sewing four-patch units August 2019 Most of the piles on top of the cutting table were put away; however, one bin held two-patch units (made several months ago from the 2.5 inch scrap bins) that I sewed into four-patch units to ultimately make a Quilt of Valor. Can you guess how many four-patch squares/units are in the photo above? Hint : it's in the triple digits. The closest guess will win a prize: guesses will be accepted until 10PM (Mountain Daylight Time) Friday, August 30, 2019.

Do You Kitchener?

Image
grafting live stitches with the kitchener stitch  I'll admit grafting stitches on my hand-knit socks was intimidating at first, but now the technique is so familiar I can do it easily as well as quickly. What is your favorite method of grafting?

Empty Needles

Image
three sets of empty needles and three pair of finished socks August 2019 My summer knitting from the sock yarn stash has resulted in five pair of finished socks. My sock needles are now all empty and ready for new projects. The socks in the photo were started in June and finished in mid-August. Other socks finished this summer were: the pair I used as a teaching tool for Carol, and the Sparkler Stripe socks . In addition to the completed socks, the infinity scarf/cowl eliminated another skein of sock yarn from the stash. I started another garter-stitch scarf with a skein of Noro sock yarn. I'm adding some random rows of eyelet lace to this scarf. Because sock knitting always results in scrap yarn, I have plans to knit some short-cuffed socks with the small balls of scrap yarn. My sock needles will not remain empty for too long: I'm on a mission to knit down my stash and my scraps.

Tools

Image
Don't you love the fuzzy slippers and cigar!  Life on the farm taught me to handle a saw, hammer, and other tools with confidence. I used those skills in my first teaching job and taught my students how to make scenery for the plays I directed. We constructed stage flats with simple wooden frames and unbleached muslin. They were built to last, and I wouldn't be surprised if some of them are still being used. I keep a small tool box in the garage with basic tools, and one in the trunk of the car, too. Are you comfortable using building tools?

Keeping It Real - part II

Image
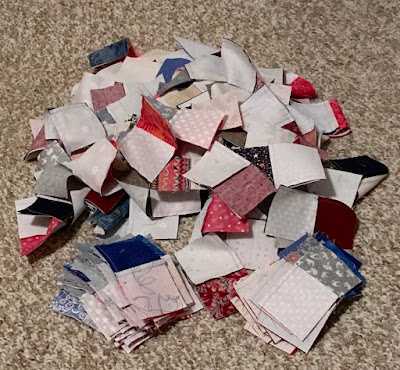
my cutting table somewhere under these piles Last week, I shared a " keeping it real " view of how my sewing projects can take over more than one room in my apartment. Today, I'm almost embarrassed to show the piles of stuff on my cutting table. This clearly shows why my sewing mojo sometimes stalls for weeks/months. The table is a handy place for "stuff" like works in progress, fabric scraps that need cut or put away, patterns, plans, and anything that needs a temporary  semi-permanent home. Presently, there is so much stuff on the table that the cutting mat is completely obscured. Rather than putting things away, I've been using a smaller cutting mat on my pressing board to cut fabric and to square blocks. Clearly, this is NOT the ideal solution to the piles on the cutting table. One of my goals for this week is to put the things on this table in their proper place.

Gill Street Mural

Image
one segment of Gill Street Mural Laramie, WY August 2018 A large mural featuring fish is painted on the back of several Second Street buildings. The open alley in that section allows the viewer to get the full perspective of the mural, but viewing each fish closeup  is necessary to see more of the details and beauty of each fish. I'll share more of the mural in coming weeks.

Autumn Star

Image
Autumn Star 56 x 70 inches Quilt of Valor #159 Made with eight fat quarters from stash and some background yardage. Pattern: Stars N Stripes by Villa Rosa Designs Autumn Star and the Twin Stars #1 and #2 are already in the hands of a volunteer longarmer and will be awarded to veterans in November.
Image
from Google images

Twin Stars

Image
Star #1 56 x 66 inches Quilt of Valor #157 These two quilts are fraternal twins - made with the same components but with somewhat different fabrics. Star #2 56 x 66 inches Quilt of Valor #158

It's a Wrap

Image
finished garter-stitch infinity scarf/cowl August 2019 The simple garter-stitch scarf is off the needles and connected into an infinity scarf/cowl. It will keep the cold off of my neck this winter. I put a twist in the scarf before connecting the ends with a three-needle bind-off. The twist allows the scarf to lay flat in the front and allows for better coverage under a coat or cardigan without adding bulk.

Keeping It Real

Image
quilting projects on the "design floor" August 2019 This photo tells the real story behind my crafting: I tend to create a mess in more than one room when sewing. I often pull various fabrics from my stash to audition border options, so it's common to see piles of fabric in crumpled heaps or in piles. Friday afternoon, I found eight, white/blue half-square triangles (HSTs) in a bin of odds and ends and turned them into star points for a couple of square, eagle panels. The striped fabric in the center of this mess was also in the scrap bin and will be used for a quick border. I worked on these two Quilts of Valor (QOV) on Friday and Saturday for the Riverton QOV group. They plan to award nearly 250 QOV to veterans for Veteran's Day. Hopefully, I'll be able to make a few more quilts for the ceremony.

I Hear You Calling . . .

Image
(click image to enlarge) Sadly, I can attest that this applies to ice cream, too! What's been calling your name?

Pom Pom Tip

Image
stabilizer for pom pom August 2019 Brenda wanted pom poms on three of the golf club covers. In my search to find a pattern for the covers, I stumbled upon a tip to help stabilize the poms and prevent them from flopping over as poms frequently do. Deborah V. Gardner suggested using a foam disc (similar to a button). Her pattern and suggestion can be found here . part of a foam door hanger I had some foam door hangers from the Dollar Store in my craft supplies. I cut off the flower petals and trimmed them into a somewhat round shape. trimming the foam into discs holes were punched in the discs with a large tapestry needle I punched holes in the foam discs with a large tapestry needle and threaded the pom pom ties through the top of the golf club cover and the disc. The poms were secured with a couple of knots and the yarn tails trimmed. I was pleased with how nicely the foam stabilized the pom to the top. I think this technique would also work for poms on the to

Fore!

Image
the prototype July 2019 The 54 inches of ribbing I mentioned in yesterday's post made the necks of six, golf club covers. Each cover required nine inches of ribbing, totaling 54 inches. three completed golf club covers August 2019 cover for the 9 iron August 2019 The covers for the five, seven, and nine irons had the colors reversed. Brenda didn't want poms for the iron covers. I made the poms but didn't attach them, so she can add them later if she changes her mind.  I'm not a golfer, but it was fun to shake up my knitting for a couple of weeks. complete set of club covers for Brenda August 2019 Pattern :     Handknit Golf Club Covers by Marni Reecer (free pattern on Ravelry) Needles : US size 8 Yarn : Caron One Pound (16 ounces per skein)      Espresso      Off-White Note : I used approximately 8 ounces of each color to knit the covers and to make the pom poms. The stitch count for the driver cover (white with one large stripe) was in

Can You Guess?

Image
closeup of ribbing in two colorways July/August 2019 Ribbing is one of my least favorite things to knit, yet in the last two weeks, I've knit a total of 54 inches of 2 x 2 ribbing. When I was visiting Brenda in mid-July, she asked me to knit some speciality items for her. She purchased the yarn; I found a pattern on Ravelry and took some measurements. When I returned home, the knitting commenced. Size 8 needles and worsted weight yarn helped the project progress fairly rapidly. I knit a total of six items - three items from each color of yarn (off-white and espresso). Any guesses what project would require 54 inches of ribbing?

Simple Joys

Image
I've even taught little kids the joy of popping the bubbles.  Do YOU enjoy popping the bubbles?