Posts

Showing posts from 2009

On the Record

Image
Items finished in September - December September Ribbed-cuff socks ( Tuscany Sunset , using 2.2 ounces of yarn from stash) Ribbed-cuff socks ( Mississippi Mud , using 2.2 ounces of yarn from stash) Ribbed-cuff socks ( Mississippi Prelude , using 2.2 ounces of yarn from stash) Ribbed-cuff socks ( Footloose Rosebuds , using 2.2 ounces of yarn from stash) Ribbed-cuff socks ( Old Man River , using 2.2 ounces of yarn from stash) Quilt Blocks (2 for Stashbusters Ugly Fabric Sampler, using fabric from stash) Ribbed-cuff socks ( Fantasy #1 , using 2.2 ounces of yarn from stash) Ribbed-cuff socks ( Fantasy #2 , using 2.2 ounces of yarn from stash) October Quilt Blocks  (4 for Stashbusters Ugly Fabric Sampler, using fabric from stash) Ribbed-cuff socks  ( Tidal Wave , using 2.2 ounces of yarn from stash) Fingerless Mitts  ( Turquoise Stripes , using 1.7 ounces of scrap yarn) Cookie Sheet Preemie Blankets  ( 4 blankets , using 7.3 ounces of yarn from stash) Quilt top,

Cuddly Blanket

Image
Between eating, visiting, and playing games, I worked on one knitting project at my nephew's house on Christmas. I finished the 30-inch square  baby blanket  on Sunday evening and delivered on Monday morning. The pattern, a simple four-row repeat and easy to memorize, allowed me to visit and knit.

Memorable Gifts

Image
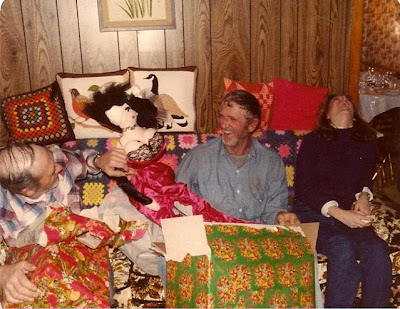
Christmas morning always brought gifts and surprises, and none was more memorable than the gift my brother, Rich opened in 1986. Note the reaction of my nephew's wife, seated on the right. No one took credit for the gift, so the guessing began. My sister, Marilyn was the culprit. The doll resided in Rich's game room for many years.

When Chores Came First

Image
Growing up on a dairy farm, I learned at an early age that no matter how special the day chores came first. Always. Christmas was no exception. Gifts could not be opened until the milking was finished, the cows fed, and the barn cleaned. It was so hard to wait until everyone came in from finishing their chores. Of course, if Santa left some gifts unwrapped, then they could be touched, but everything else was off limits. The photo above was taken in the milking barn during the summer of 1973. It shows my brother (Rich), my nephew (Larry), and my mother (Rosa). All of the grandkids spent summers on the farm and learned to milk, drive tractors, and work in the fields. It was a way for them to stay busy and to make some money.  I had just graduated from college when this photo was taken. My sister, Evelyn took this photo of my mother on Christmas day 1987. Mom was 74 years old and still working in the barn every morning and night. She dressed in layers and cut the right arm of

Christmas Traditions

Image
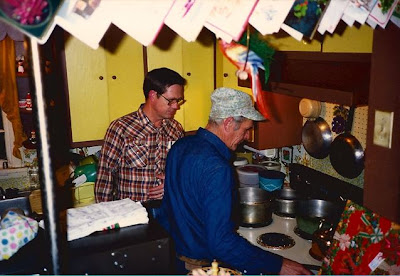
For the Christmas Eve meal, my family always served Oyster Stew. I didn't care for the oysters when I was young, but I liked having a bowl without any oysters in it. Gradually, I came to love the oysters, too. This photo from 1986 shows Paul, my brother-in-law, and John, my oldest brother, preparing the stew. John had the procedure down to a science. Notice the cards hanging above. Mom used to hang her cards on this opening and on the archway into the living room. I still prepare and serve Oyster Stew for Christmas Eve. Does your family have a traditional meal on Christmas Eve?

Christmas Memories

Image
My mother loved Christmas and always made it a magical time. She spent hours placing individual icicles on each branch. Sometimes the trees were really scrawny, so my brother drilled holes in the tree and then "grafted" branches from the bottom. This tree (circa 1971) was one of the last "real" trees she decorated. My sister, Marilyn made the Raggedy Andy and Ann dolls for Mom. The Club Aluminum cookware was new that year and was finally "retired" in the 90s.

Who was Sally Ann?

Image
My mother wrote the recipe for Sally Ann's on the end flap of her favorite cookbook. Nothing about this cookie is fancy, but for my sister and me nothing beats a Sally Ann and a cup of tea or coffee at Christmas. Marilyn sent an email last week reminding me to make Sally Ann's. (As if I needed a reminder.) Yesterday I prepared the dough and baked them this morning. Mom never spoke of a Sally Ann, and no one in the extended family is even named Sally. Several years ago I asked my Uncle Oscar if he remembered his mother making Sally Ann's. He smiled and said that he did, so obviously the recipe is very old. Oddly, even though they contain two cups of sugar, the cookies are not overly sweet. Sally Ann's yield about 4 dozen cookies 3/4 c. butter or margarine, softened 1/2 c. shortening 1 c. brown sugar, packed firmly 1 c. white sugar 4 1/2 c. flour 1 tsp. ground cinnamon 1/2 tsp. ground cloves 1 tsp. baking powder 1 tsp. soda 3 beaten eggs 1 or 1 1/2 c

Company's Coming

Image
My sister and her husband are on the way, so it's time to change the sheets, go grocery shopping, bake a batch of cookies, and do some dusting.  In order to spend more time with family, I am scheduling posts for the rest of the week. I'll see you after Christmas. Merry Christmas!

Inching Along

Image
One of the hospital employees asked me to knit a blanket for a grandchild. The yarn is from my stash - Caron Simply Soft in a soft ivory, called Fisherman. It is knit, double-stranded, on size 13 needles. The pattern is #EBB09 designed by JoAnne Turcotte and published in the 8-Hour Baby Blanket book, Plymouth Yarn, 2007. The book price ranges from $5 to $8, so look around for a good price. Two skeins of yarn (3 ounces each) created nearly 10 inches. I am pleased with the pattern and the look of the blanket.

Winter Set

Image
My nephew's wife wants a hat, scarf, and mitten set. She purchased the yarn and the pattern and intended to knit it herself. However, she determined that she could not understand the pattern and asked if I would make it for her. The pattern calls for double-stranded, bulky yarn and knit on size 15 and 10.5 needles. She purchased a boucle yarn. Once I started knitting the hat, I knew the yarn was going to give me problems: it was nearly impossible to see the stitches and sometimes one of the strands would slip. I breathed a sigh of relief once I finished the 72-inch scarf. Earlier, I determined that I would not even attempt to make the mittens with the boucle. I found a dark purple acrylic yarn in my stash that matches the boucle very well. The red in the boucle doesn't allow the solid mitten to photograph correctly, but trust me it is a very close match. The second mitten will not take long, completing Katie's winter set.

Ornament Exchange

Image
Jen , a PH friend, sent me the cute ornament with the red bird as part of an ornament exchange with individuals on the PHA Message Board. It fits comfortably with all of the other ornaments. My tree is filled with memories of my childhood (see the doll-sized mirror) and of my friends (the snowflake on the left) and of trips that I've taken (the snowflake on the right). It is also covered with glass icicles which seem to twinkle when the colored light hits them just right. One of the "ornaments" on my tree is a wishbone from the 1977 Christmas turkey. What is the oddest ornament on your tree?

Frugal Greetings

Image
I love sending and receiving greeting cards, and I enjoy giving them another opportunity to spread their cheer. Here is how you can up-cycle your holiday greeting cards into postcards. The bonus is that the postage for postcards is 28 cents! First, make sure that the card is an appropriate size. The U.S. Postal Service has specific requirements for postcards: minimum size 3.5 inches high and 5 inches long or maximum size 4.25 inches high and 6 inches long. Any other sizes will result in additional postage. Second, make sure the other side does not have any writing on it. I also do not use the cards that have an embossed image as it makes it difficult to write on them. I use a small portable paper cutter to trim the card, but you could easily use scissors. Center the design on the card as you do the trimming. Check for the proper size and trim more, if necessary. Any card can be salvaged, so don't overlook other holidays and occasions. Of course you can simpl

Helpful Tools

Image
I use coil-less safety pins all the time when I knit. They make handy markers to help me judge distances and how much longer a piece needs to be. They are moveable motivators that help me to see just how much I knit in one sitting, especially helpful when the project is large and seemingly without an end. But I discovered when I combine the pins with numbered or alphabet beads that they become even more useful. I am working on ribbed scarf for my nephew's wife, who purchased the yarn and selected the pattern. The yarn is a bulky boucle, and not the most pleasant yarn with which to knit. It is difficult to see the stitches, so I am using the coil-less safety pin with a "K" on the side that begins with a "knit" stitch, and a "P" on the side that begins with a "purl" stitch. I can see at a glance rather getting frustrated from searching. I also used the pins when quilting: they don't have exposed sharp ends like the speciality pins wi

Time for Recess

Image
One of the ladies in my knitting group works at a school, and last week she asked the group to knit some hats. In cold weather, the teachers do not allow the students to go outside for recess unless they can prove they have a good coat, gloves, and a hat. Many of the children did not have hats. I told her I had two hats made and would bring them to knitting this week. Then, I found some oddballs of wool yarn (what a shock, right?) and made a few more. The yarn balls in this photo made the following hats. (I did add a bit more white to make the hat in the top left) It is difficult for elementary children to be inside all day. Now, at least eight will have the chance to go outside and run off some energy. Check with schools in your area to see if they need some hats. A quick note to answer a question: I use my postal scale a lot. I weigh a finished item to see how much I need and then find close to that amount in my scrap bag, but even so, I've come close to running out of y

Blessing in Disguise

Image
Last week's cold weather was a true blessing in disguise. Wednesday night I grabbed a frozen dinner from the deep freeze in the garage, and when my hand brushed against a loaf of bread that was soft, I knew I had a problem. Since the electrical breaker and outlet were fine, it was obvious the chest freezer had died. I wasn't really surprised because the freezer was over 29 years old: it had been faithful for nearly 10,602 days. I worried that the contents of the entire freezer would have to be discarded. I tossed thawed vegetables and pizza, fruit and soups from the top of the freezer, but the meat at the bottom was still frozen solid. I put some of the packages of beef in my side-by-side in the house and the rest in a plastic garbage can.  I set the can outside the garage door where the sub-zero and frigid temperatures would keep the contents from thawing until I could find a replacement freezer. By Thursday evening the meat was back in the garage safely tucked in the

Scoundrels Abound

Image
I admit it - I am an idealist with images of how the world should be and delusions that all people are honest.  I received a statement in the mail several months ago for Creative Knitting . I like the magazine and promptly sent in payment without any question.  Fast forward to yesterday when a statement arrived for Knit Simple . I checked my list of magazines and discovered that I had already renewed it for two years, but nothing on the statement reflected the expiration date.  The buzz on one of my Yahoo Groups is about statements for quilting magazines that the individuals hadn't ordered or had previously renewed, so I began to wonder about my invoice. I found contact information on the Knit Simple website and sent an email, inquiring about my subscription expiration date. I received this response: Re: [Subscription Inquiry] subscription renewal notice‏ Nancy, Please disregard mailing from Publishers Billing ---- this mailing is not authorized by SoHo Publish

Quick Gift Idea

Image
Need some gifts in a hurry?  Make some bookmarks out of flat pendants, ribbon, and beads. I found the flat pendants in the clearance section at Michaels (75% off of the previous markdown price), so I got two pendants for less than a dollar. Even the ribbon (1/8 inch wide) was on sale. Begin by removing the ring at the top of the pendant. Cut the ribbon into 12 - 14 inch lengths and fold in half. (I used two different ribbons.) Carefully insert the folded ribbon through the hole in the pendent. I preferred threading it from back to front, but you may decide to go front to back. Insert the tails of the ribbon through the loop, you created. Tighten the ribbon and adjust, if necessary. Now you will need some beads or charms. I had some remaining from the stitch markers I made last year. Make sure the beads have large holes to allow the ribbon to be threaded through them. I found a small tapestry needle handy for coaxing the thread through. Tie a knot at both ends of the b