Posts

Showing posts matching the search for Granny square quilt blocks

Trimming Blocks

Image
This post is for the non-quilting readers who asked how I was going to sew the zig zag edges of the Granny Square blocks that I've started making with scraps in June. Earlier posts can be seen here . Granny Square blocks I put the blocks together like a jigsaw puzzle to photograph them, but I doubt ANY quilter would ever attempt to sew the blocks together without squaring them, which is what I did once I had enough blocks for a complete quilt. First, I measured 1/4 inch from the tips of the colored squares. The 1/4 inch is needed for seam allowance. Once the seam allowance was determined, I cut off the edge, rotated the block and measured the other sides - making sure the entire block was square. These blocks were trimmed to 9 inches and with the seam will finish at 8.5 inches. Trimmed block Now, that the blocks are square and are all the same size, putting them together into a quilt top will be easy. trimmed Granny Square blocks ready for sashing ...
Granny Square Blocks

Image
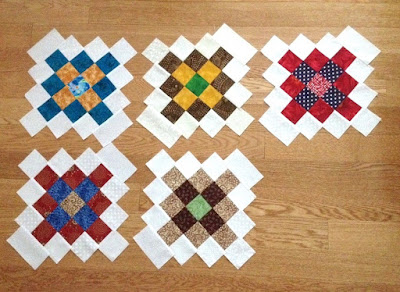
Granny Square blocks In addition to the initial Granny Square block (top middle) I managed to make four more blocks out of the scrap bin. I've been cutting and prepping fabric to make more of these addictive blocks, so the scrap bin should provide enough fabric to make blocks for another Quilt of Valor. For non-quilters, the blocks look shaggy, but they will be trimmed when I am ready to sew them together. The trimmed blocks will have a lot of bias edges that are prone to stretching when handled; thus, to reduce the stretching, the blocks will be trimmed later.

Scrap Patrol - Granny Style

Image
my first Granny Square block June 2015 Before I begin cutting into any new fabric, I MUST bring my scraps under control - again! I've been admiring Lori's Album (granny square) blocks for a long time ( her nearly finished quilt can be seen here ), and when she posted that she was making more blocks , I decided it was time to get some scraps under control, using this block pattern. While the directions that Lori used are no longer available online, I did find this source that shows two techniques (scraps and strips) to make the blocks as well as setting ideas. Lori's blocks have another round of colored squares, and I didn't notice until I had several blocks made. Drat! I've decided to continue making them like the one pictured until I have enough for a quilt. The blocks for the next quilt will have the 16 squares, like Lori's blocks.

Treasure Chest

Image
Treasure Chest  63 x 73.5 inches Quilt of Valor With the exception of the white sashing, Treasure Chest  was made entirely from scraps. This is Quilt of Valor #72, which makes #22 for 2015. Lori gave me the inspiration to make the Granny Square or Album blocks.  Thanks, Lori. I have plans to make at least one more Granny Square quilt from my 2.5 inch scraps. A complete list of the Quilts of Valor that I've made can be found  here .

Even More Granny Blocks

Image
Granny Square (Album) blocks Once all the preparation  is done, these blocks go together quickly, and they are ADDICTIVE! Nearly enough blocks for a quilt top I'm happy that the pile of blocks is growing and that I have nearly enough to make a quilt top. These blocks will be trimmed and sashed with white.

Fiesta

Image
Fiesta Quilt of Valor 59 x 68 inches Fiesta, the first Quilt of Valor (QOV) finish for 2016, was created with the granny square blocks that I was working on in this  December 17th post and this  December 29th post . Once the blocks were finished and trimmed, the quilt top came together quickly. I decided not to use sashing like I did with Treasure Chest and Gemstones . Fiesta is QOV #83